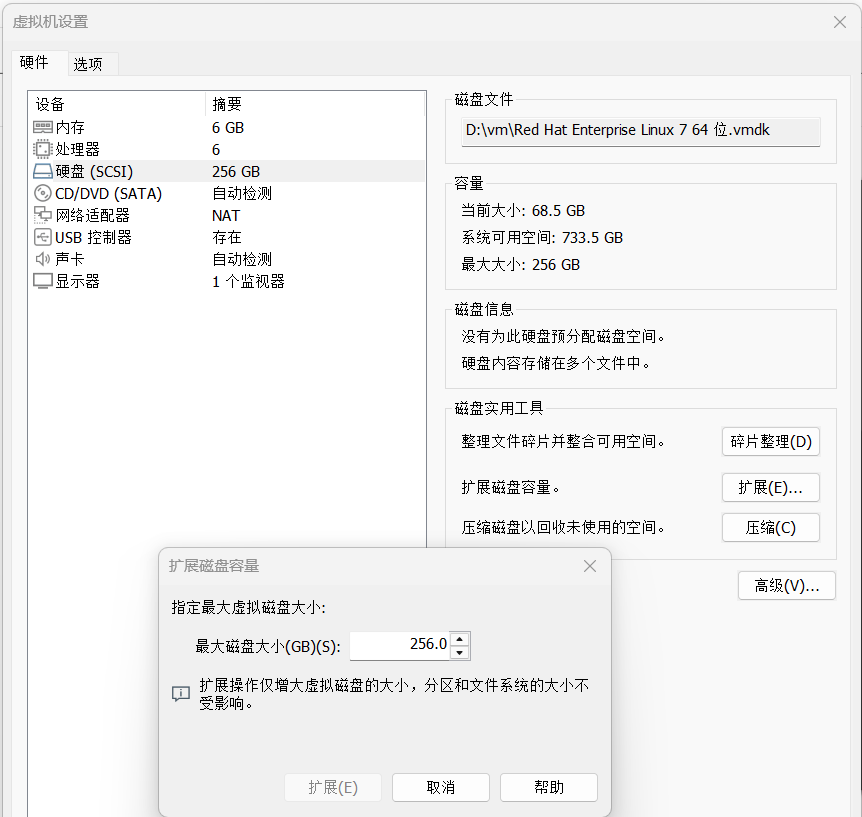
第一步:在虚拟机关闭状态下,点设置,硬盘,扩展,填入希望扩大到大小,比如256G。
第二步,启动虚拟机,打开一个terminal,切到root。
[root@myvm ~]# fdisk -l

Disk /dev/sda: 274.9 GB, 274877906944 bytes, 536870912 sectors
Units = sectors of 1 * 512 = 512 bytes Sector size (logical/physical): 512 bytes / 512 bytes
I/O size (minimum/optimal): 512 bytes / 512 bytes
Disk label type: dos
Disk identifier: 0x00063057

Device Boot      Start         End      Blocks   Id  System
/dev/sda1   *        2048      616447      307200   83  Linux
/dev/sda2          616448     8744959     4064256   82  Linux swap / Solaris
/dev/sda3         8744960   167772159    79513600   83  Linux
从fdisk -l的结果看,可以识别到80G的硬盘变成了256G
第三步:确认磁盘格式为xfs,没有LVM。需要扩大的根分区是sda3
[root@myvm ~]# lsblk -f
NAME   FSTYPE LABEL UUID                                 MOUNTPOINT
sda
├─sda1 xfs          93794186-ed26-463a-b24d-7bf37d834a5c /boot
├─sda2 swap         69f9acc6-6695-4845-8d15-f63430d4c1de [SWAP]
└─sda3 xfs          e0af8f45-b012-47d6-90d5-41391790f490 /
sr0
第四步:查找sda3的起始扇区:8744960
[root@myvm ~]# fdisk -l /dev/sda | grep "^/dev/sda3"
/dev/sda3         8744960   167772159    79513600   83  Linux
第五步:用fdisk /dev/sda,删除分区sda3,再重建sda3。起始扇区不变,结束扇区扩展。
需要注意的是:“起始扇区不变”是不丢数据的重要条件。
[root@myvm ~]# fdisk -l /dev/sda | grep "^/dev/sda3"
/dev/sda3         8744960   167772159    79513600   83  Linux

[root@myvm ~]# fdisk /dev/sda
Command (m for help): p

Disk /dev/sda: 274.9 GB, 274877906944 bytes, 536870912 sectors
Units = sectors of 1 * 512 = 512 bytes
Sector size (logical/physical): 512 bytes / 512 bytes
I/O size (minimum/optimal): 512 bytes / 512 bytes
Disk label type: dos
Disk identifier: 0x00063057

Device Boot      Start         End      Blocks   Id  System
/dev/sda1   *        2048      616447      307200   83  Linux
/dev/sda2          616448     8744959     4064256   82  Linux swap / Solaris
/dev/sda3         8744960   167772159    79513600   83  Linux

Command (m for help): d

Partition number (1-3, default 3): 3
Partition 3 is deleted

Command (m for help): n
Partition type:
p   primary (2 primary, 0 extended, 2 free)
e   extended Select (default p):p
Partition number (3,4, default 3): 3
First sector (8744960-536870911, default 8744960): 8744960
Last sector, +sectors or +size{K,M,G} (8744960-536870911, default 536870911):
Using default value 536870911
Partition 3 of type Linux and of size 251.9 GiB is set

Command (m for help):p

Disk /dev/sda: 274.9 GB, 274877906944 bytes, 536870912 sectors
Units = sectors of 1 * 512 = 512 bytes
Sector size (logical/physical): 512 bytes / 512 bytes
I/O size (minimum/optimal): 512 bytes / 512 bytes
Disk label type: dos
Disk identifier: 0x00063057

Device Boot      Start         End      Blocks   Id  System
/dev/sda1   *        2048      616447      307200   83  Linux
/dev/sda2          616448     8744959     4064256   82  Linux swap / Solaris
/dev/sda3         8744960   536870911   264062976   83  Linux

Command (m for help):w
The partition table has been altered!

Calling ioctl() to re-read partition table.

WARNING: Re-reading the partition table failed with error 16: Device or resource busy.

The kernel still uses the old table. The new table will be used at the next reboot or after you run partprobe(8) or kpartx(8) Syncing disks.
依次输入以下命令(每行后按回车):
| 输入 | 说明 |
|---|
p | 打印分区表,确认当前布局 |
d | 删除分区,然后输入 3 删除 sda3 |
n | 新建分区 |
3 | 分区号(保持为 3) |
8744960 | First sector(起始扇区)必须手动输入上面记下的数值,不要按回车默认! |
| 直接按回车 | Last sector 使用默认(即最大空间) |
| 如果提示“检测到 xfs 签名” | 输入 N(保留原签名,不创建新文件系统) |
p | 再次打印,确认 Start=8744960,End 变为 536870911,Size 约为 256G |
w | 写入分区表并退出 |
第六步:刷新内核分区表,扩展xfs文件系统
[root@myvm ~]# partprobe /dev/sda

[root@myvm ~]# xfs_growfs /
meta-data=/dev/sda3              isize=512    agcount=4, agsize=4969600 blks          =                       sectsz=512   attr=2, projid32bit=1          =                       crc=1        finobt=0 spinodes=0 data     =                       bsize=4096   blocks=19878400, imaxpct=25          =                       sunit=0      swidth=0 blks naming   =version 2              bsize=4096   ascii-ci=0 ftype=1 log      =internal               bsize=4096   blocks=9706, version=2          =                       sectsz=512   sunit=0 blks, lazy-count=1 realtime =none                   extsz=4096   blocks=0, rtextents=0 data blocks changed from 19878400 to 66015744
第七步:验证结果
[root@myvm ~]# df -Th
Filesystem     Type              Size  Used Avail Use% Mounted on
devtmpfs       devtmpfs          2.9G     0  2.9G   0% /dev
tmpfs          tmpfs             2.9G     0  2.9G   0% /dev/shm
tmpfs          tmpfs             2.9G   13M  2.9G   1% /run
tmpfs          tmpfs             2.9G     0  2.9G   0% /sys/fs/cgroup
/dev/sda3      xfs               252G   63G  190G  25% /
vmhgfs-fuse    fuse.vmhgfs-fuse  454G  339G  115G  75% /mnt/hgfs
/dev/sda1      xfs               297M  138M  159M  47% /boot
tmpfs          tmpfs             579M   20K  579M   1% /run/user/1000
🎉 扩容成功!
从 df -Th 输出可以看到,/dev/sda3 的大小已从原来的约 80GB 变为 252GB,可用空间从不足 20GB 增加到 190GB,整个操作过程 数据完整,文件系统无损。
📊 **最终状态 **